
WP Rocket powers over 200k WordPress websites in the world, which is a staggering number for a paid-only plugin. Therefore, it is undeniably one of the best caching plugins for WordPress.
WP Rocket is not only a caching plugin. It comes with many other features that help increase your website’s speed. You name everything from caching to data optimization to lazy load, and WP Rocket has covered it for you.
That’s why most people like WP Rocket over other solutions for their WordPress Websites. I have been working in the industry for over five years, and most of the time, I prefer WP Rocket because it reduces my task and helps site owners to operate their sites without any hassle.
So, have you purchased your license for WP Rocket? Now it’s time to customize the plugin. The best part of WP Rocket is it’s very easy to customize. It comes with nearly 80% customization. So, you have to deal with just some little things. And the developers show what happens if you turn on or off an option. Moreover, they always suggest to you which one is the standard option.
Now, let’s set up your WP Plugin in WordPress.
Recommended Reading: How to increase the speed of your WordPress website.
Table of Contents
Installing WP Rocket Plugin
Before installing you have to purchase WP Rocket from their official website. Here is the latest price list:

Regular process/Automatic Process
The installation process is as very easy. You have two options – Direct from the dashboard and using an FTP client (i.e., Filezilla.). Here are the steps:
You’ll need to download the WP Rocket plugin from the account page of WP Rocket after you make the purchase.
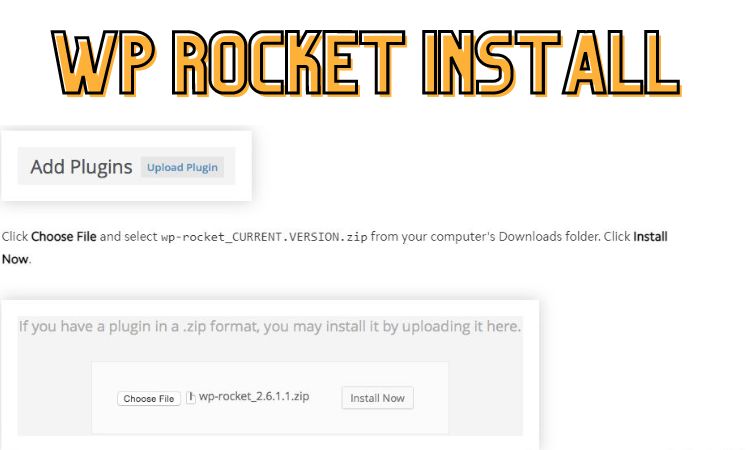
- Go to WordPress Dashboard and Click “Plugin”
- Upload the downloaded plugin (DO NOT Unzip it)
- Next, click on the “Install” button in the plugin toolbar.
- This will take you to a screen where you can choose where WP Rocket should be installed on your WordPress site.
- We recommend installing WP Rocket on your blog’s root folder (where all of your blog content is located).
- Click on the “Install Now” button to install WP Rocket on your WordPress site.
- Once WP Rocket is installed, you’ll see a new menu item called “WP Rocket” in your WordPress admin area.
Using A FTP
If you’re only interested in the manual installation process, WP Rocket can be installed that way. It’s a straightforward process that can be done through FTP software on any type of hosting platform. I would recommend Filezilla. The first step is to open the zip file and extract the contents. Once you are in the folder, navigate with a right-click on the file, choose “Extract All,” and follow the remaining instructions.
Mac OS
If you are using safari, you should go to Preferences and un-check the box “safe” files after downloading. That will not unzip the file after downloading.
On Linux
If you’re trying to extract a file from a ZIP archive, then all you have to do is use the “unzip” command instead. The extracted files are now considered owned by the user running them. You also need to write permissions for the directory where the extraction happens.
How to activate the license key
If you have a WP Rocket account, you can activate your license key by following the steps below. First, you’ll need to define two constants in the wp-config.php file. The first line should be replaced with your account email address, and the second line requires your API key.
This key is available in your WP Rocket account. Once these two things are defined, you just need to open the license-data.php file and copy the value found in WP_ROCKET_KEY.
This step is a helpful method of validating the license without going through a complete reinstall process. It works well when resetting the API key, migrating the permissions, and similar events.
You’ll need to define two constants in the wp-config.php file:
define( 'WP_ROCKET_EMAIL', 'YOUR ACCOUNT EMAIL');define( 'WP_ROCKET_KEY', 'YOUR API KEY');Replace the information in the first line with the email address associated with your WP Rocket account. The second line requires your API key, which is available in your WP Rocket account. Just open the license-data.php file and copy the value found in W
By following these steps, you can easily activate your license key and get started using WP Rocket! If you change your licensing information, the update does reset the plugin settings. You would need to explore them to have them imported again after.
NOTE: Before you decide to change your license settings, it’s important to know that this will reset your settings and data. To avoid a lot of hassle, trying to reimport them afterward could be valuable. When you decide to make the switch, be sure to Export WP Rocket settings first!
You can check this documentation page of WP Rocket for more detailed information. Or, you can contact their support if you face any problems.
Finding the Best Settings for WP Rocket
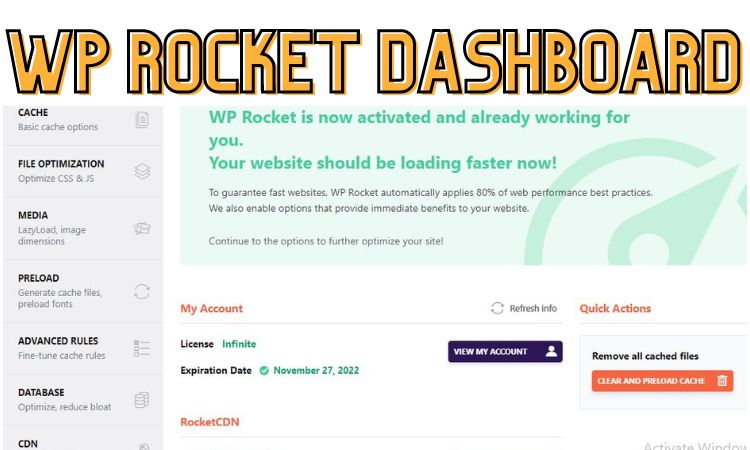
You will see an immediate speed change after you install WP Rocket. But there are a few things you need to tweak for the best setup.
To get the best results from WP Rocket, you’ll need to configure it correctly. Here are some tips on how to do that:1. Choose a Cache Size, and FrequencyThe first thing you’ll need to do is choose a cache size and frequency.
The cache size determines how much data the plugin can store on your server, while the frequency determines how often the data is updated. A cache size of 1MB or higher is ideal for most sites. However, if your site experiences heavy traffic, you may want to increase the cache size to 4GB or more.
And if you experience high levels of Site Speed Index (SSI) errors, try setting the cache frequency to every 5 minutes or less.2. Configure Caching OptionsOnce you’ve chosen a cache size and frequency, you’ll need to configure caching options.
WP Rocket supports three types of caching: static file caching (SFC), database caching (DBC), and object caching (OC).SFC caches static files in your WordPress site’s wp-content folder. This includes images, stylesheets, and other files that don’t change often. DBC caches your WordPress database in memory. This speeds up access to your database during page loads by users.
Basic Configurations of WP Rocket
| Lazy Load | If you’re trying to fight back against performance problems or simply want to reduce the time it takes for your site or post to load, Hide Invited Images can help. These are images that are automatically sent along with the content and don’t need to be seen. This option helps make the page load faster for users by removing those images when they don’t need them. You will find this option in the media section. Don’t forget to deactivate other lazy load options from other plugins. |
| Mobile Cache | Responsive themes are beneficial for any website because they apply to all mobile users. So, you must activate this option. |
| Remove Unused CSS | If you’re a WordPress site owner with a site that has been built a specific way, you’ll need to do some extra work to get WP Rocket working. Some of the benefits of this advanced feature include reducing CSS size and reducing the amount of main thread work |
| Minify/Combine | The size of your JavaScript and CSS files can be decreased using a process called “minification.” Depending on how large your site is, this may boost the performance grade or have no influence on load time at all. You can save time by using the combine option to merge all of your separate CSS and JS files into a single, unified document. |
| JS Deferred | We suggest utilizing Ajax, JavaScript, and CSS to enhance your site’s performance. Delaying the execution of JavaScript on a WordPress site until the page has finished loading is the most effective technique to boost performance. |
| Delay JS Execution | PageSpeed makes web pages load faster by delaying inline scripts and files until user interactions occur. This optimization can delay inline scripts and files so that scripts will be executed instantly when a user scrolls down a page or touches the screen. |
Run a Database Clean
Any WordPress user knows that one of the best benefits of using WP Rocket is the option to clean up your WordPress database. Although the performance gains from doing so are minimal, it can make managing your posts and pages a lot easier.
In just a few clicks, you can clear out old revisions and drafts, spammy or trashed comments, and other unnecessary data that’s taking up space in your database.
And since WP Rocket provides clear instructions on which options to select, even beginners can take care of this critical task with ease. So if you’re looking to streamline your WordPress site, be sure to perform a database cleanup after configuring WP Rocket. Your future self will thank you for it!
One thing I should tell you is DO NOT depend on your previous versions of blog posts while you use database cleanup because it will remove the previous versions after a certain period.
Reduce Bandwidth Usage by Minifying files
WP Rocket is a powerful caching plugin that can help you improve your website’s performance. One of the features it offers is the ability to minify static files.
This means that the size of those files is reduced, which can lead to reduced bandwidth usage and potentially lower hosting costs.
The minifying process can sometimes cause files to stop working or fail to load, so it’s important to test each page after making changes. You can also use WP Rocket to combine Google Fonts files and remove query strings. These options can help you further optimize your website for speed and performance.
Caution: This process can break your site. So, unless you are an experienced developer, I will highly recommend not using this feature.
In case, if you can't afford WP Rocket or your client doesn't want to spend money immediately, you can check WP Rocket Alternatives.
Why Should use WP Rocket to Increase the speed of your WordPress Website?
If you’ve ever been frustrated by a slow-loading website, you’re not alone. Studies have shown that people are increasingly likely to abandon a website if it takes more than a few seconds to load. This is especially true for eCommerce sites, where even a small delay can result in lost sales.
Fortunately, there are a number of ways to speed up your website. One of the most effective is to use a caching plugin. Caching stores a copy of your website’s files and serves them to visitors without having to generate them each time they visit.
This can significantly reduce loading times. WP Rocket is one of the most popular caching plugins available. It’s easy to use and provides a wide range of features, making it an ideal choice for anyone looking to speed up their website.
WP Rocket is a fast, reliable, and easy-to-use WordPress plugin that can turbocharge your website speed. It makes your site faster by removing unnecessary steps and by, caching static files, and speeding up loading times. It also optimizes your WordPress theme for faster performance and provides a host of other features to improve overall website speed.
With WP Rocket, you can get:-Speed up loading times for your WordPress site-Optimize your WordPress theme for faster performance-Remove unnecessary steps from your website process-Caching of static files for faster page load times-Improved Google PageSpeed Insights score.
Conclusion
If you are looking for an all-in-one solution to increase the speed of your website, WP Rocket is the ultimate solution. I hope this blog post on how to set up WP Rocket was helpful to you. Don’t forget you can always contact their support team to assist you in case of any problem. And if you don’t understand any customization process just follow their instructions.
And don’t forget to follow my instructions here as well. That will help you to easily customize your plugin. In addition to caching, WP Rocket also offers lazy loading, which delays the loading of images and other non-essential content until it’s needed. This further reduces loading times and improves the user experience. With so much to offer, it’s no wonder WP Rocket is one of the most popular caching plugins available. If you’re looking for a way to speed up your website, WP Rocket is an excellent c
")

